
For schools · Money
Memberships: start, pause and cancel
Add a membership, take the first payment at the desk, pause it, move the billing date, and cancel when a family leaves.
Jump to a part
Step by step
The same steps as the video, with what to look for on each screen. The orange box shows where to look.
Add a membership
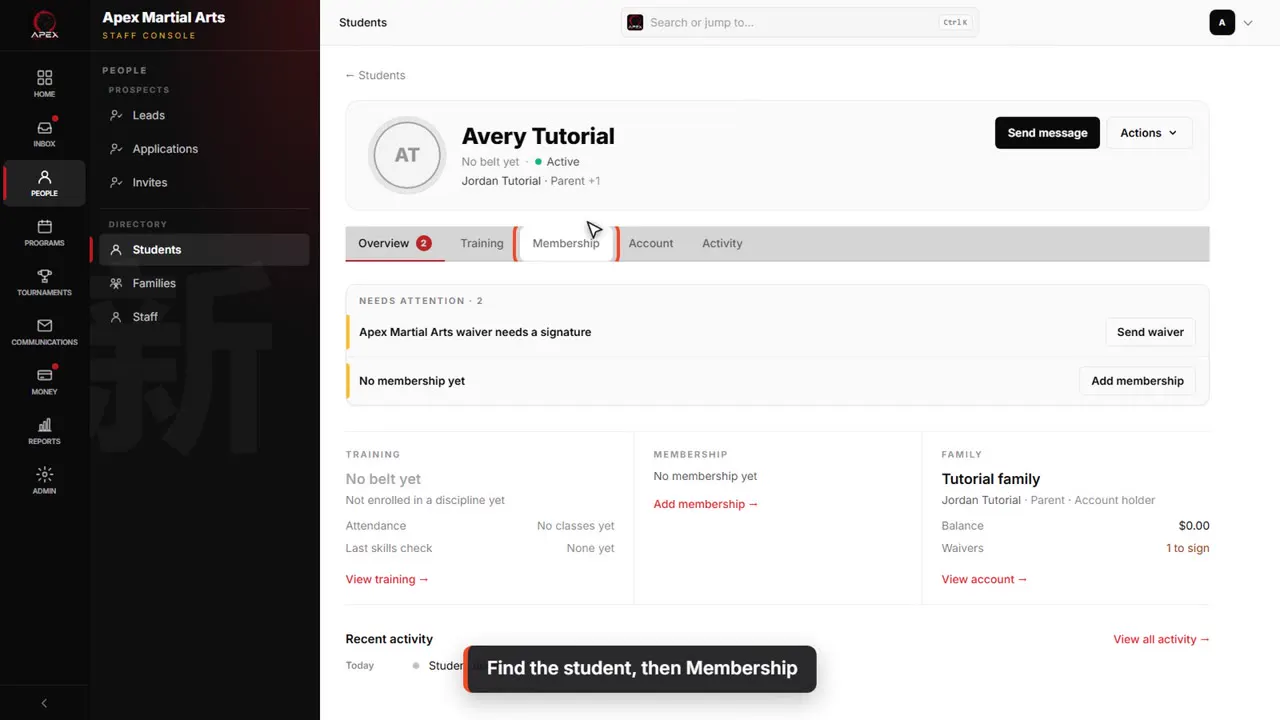
Find the student, then Membership
Open the student's profile. Search finds them by name. Then click the Membership tab.
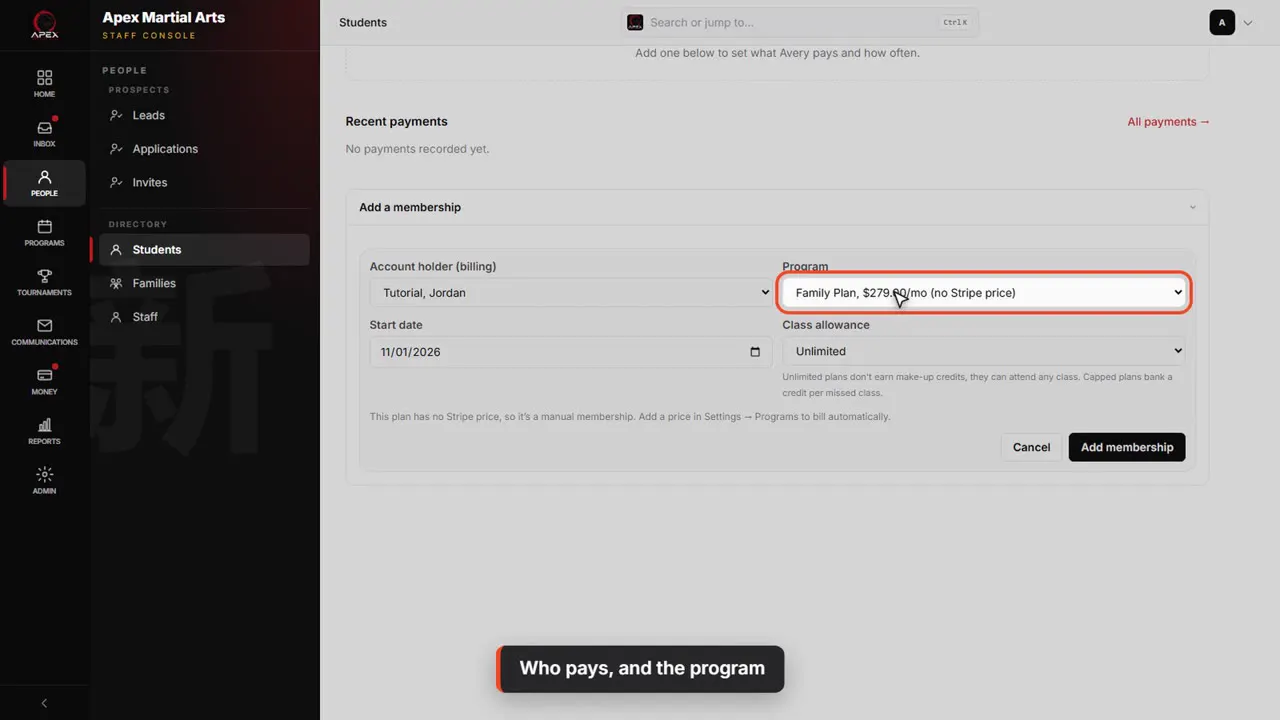
Who pays, and the program
With no membership yet, the Add a membership form is already open. Pick the account holder who pays, then the program.
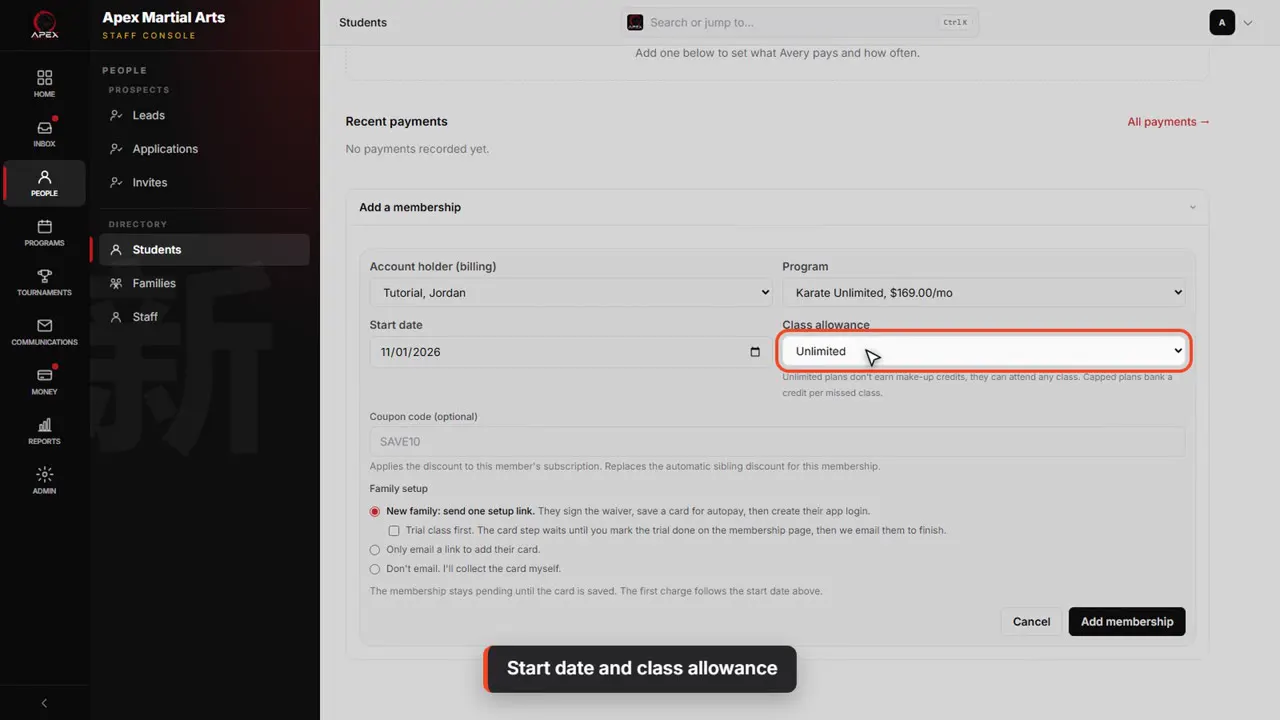
Start date and class allowance
The start date is today unless you change it. Class allowance is unlimited, or a set number of classes a week, a month, or on a class card.
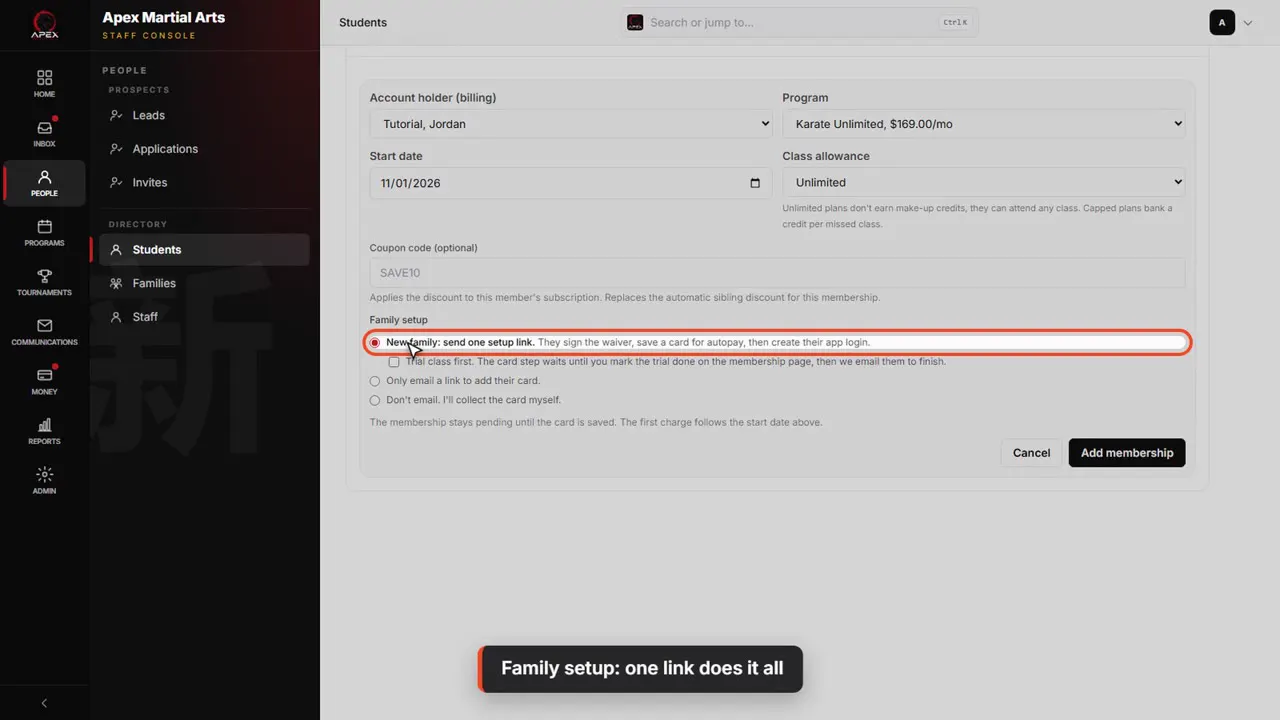
Family setup: one link does it all
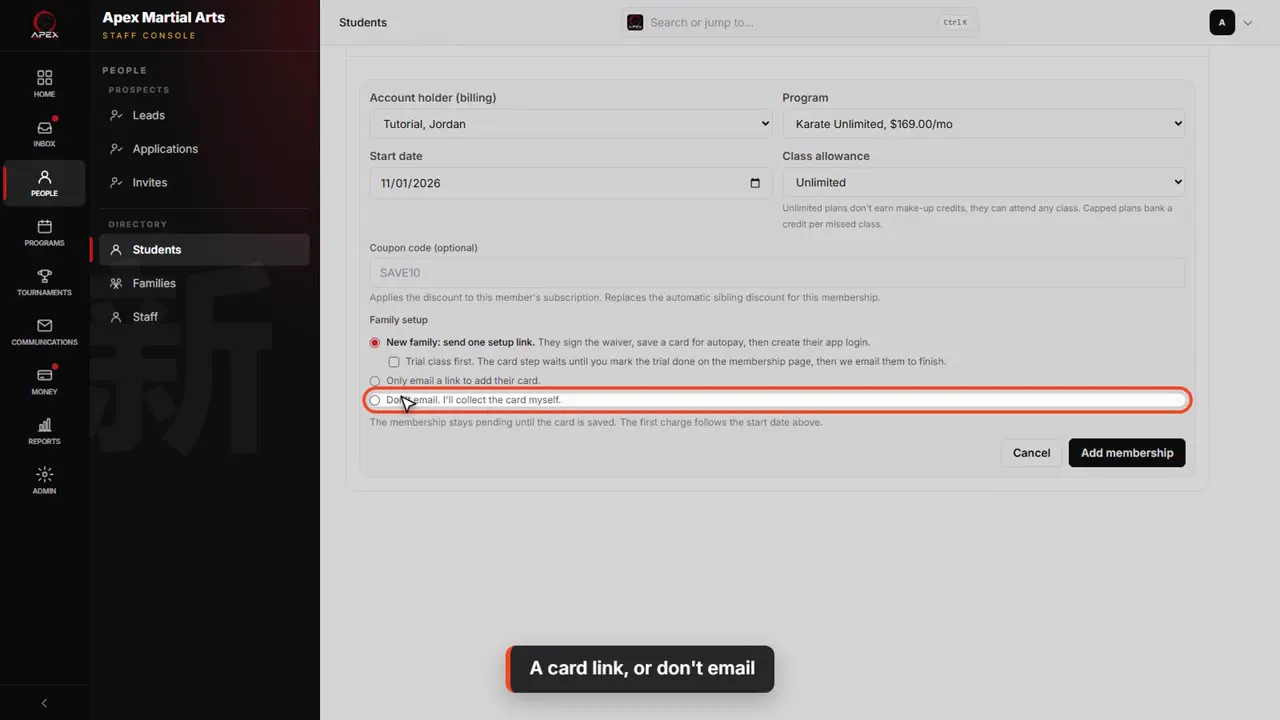
Family setup is how you get their card. The first choice emails one setup link: the family signs the waiver, saves a card for autopay, and creates their app login.
A card link, or don't email
Or email only a link to add their card. Or send nothing and collect the card yourself. We'll send nothing.
Add membership
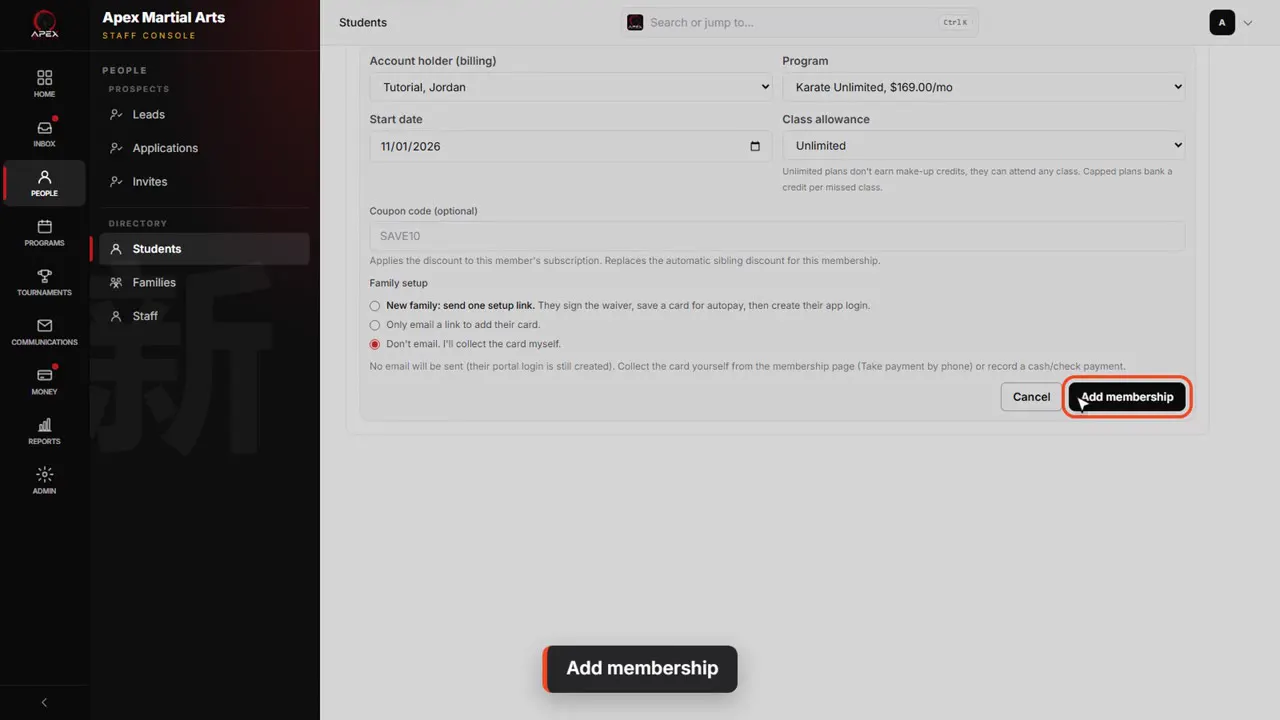
Click Add membership. Nothing is charged yet: it waits for the family's card or a payment.
Waiting for the first payment
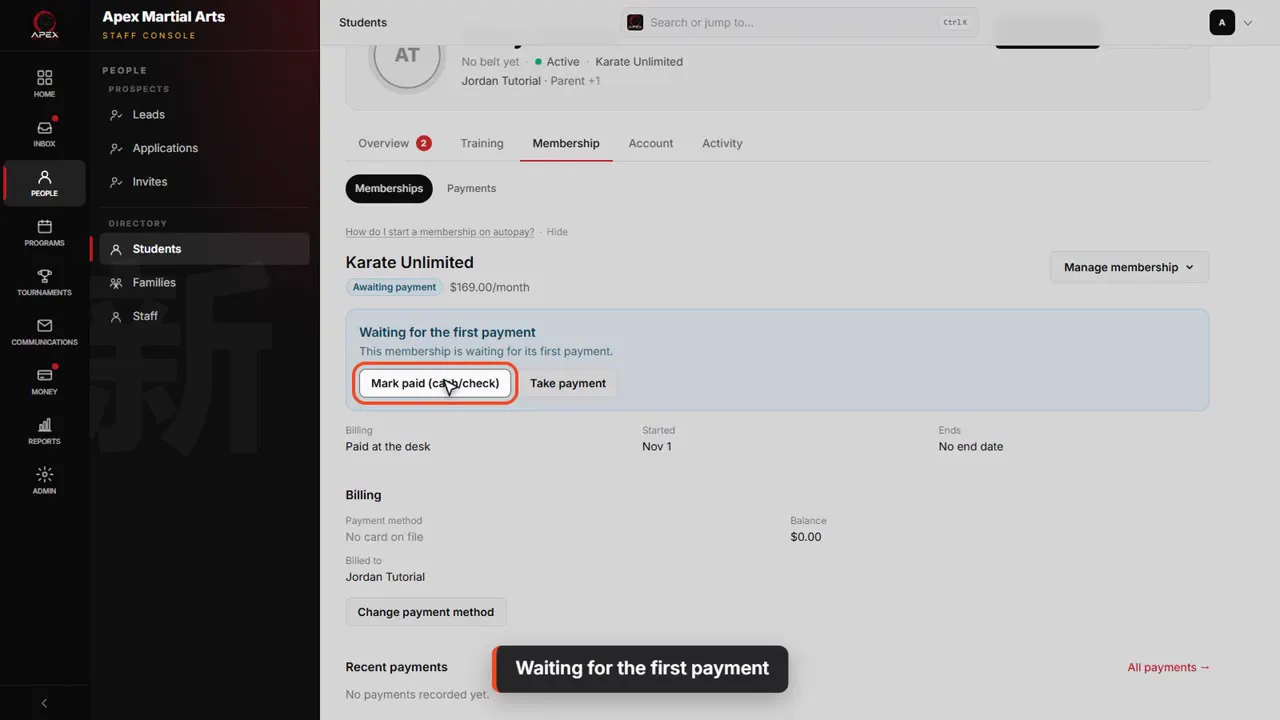
It shows Waiting for the first payment. When their card is saved, the membership starts and billing runs from the start date. Paying at the desk instead? Click Mark paid.
Cash or check
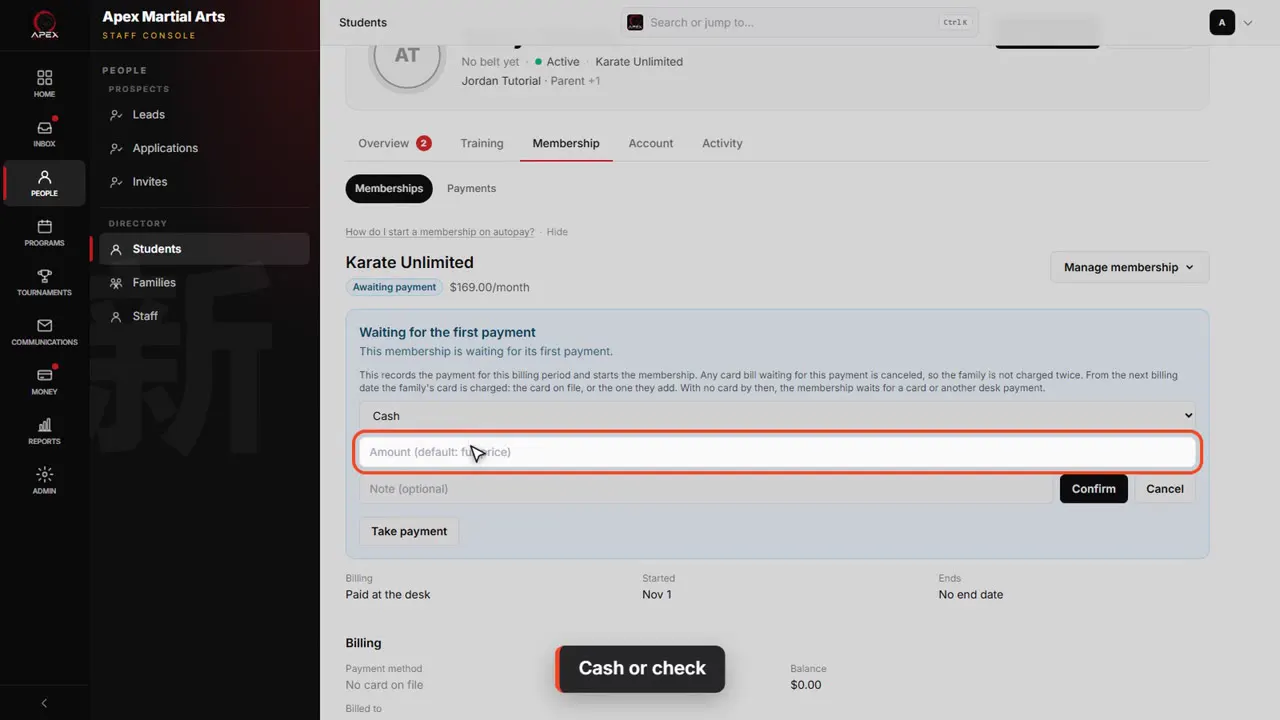
Pick cash or check, and leave the amount blank for the full price.
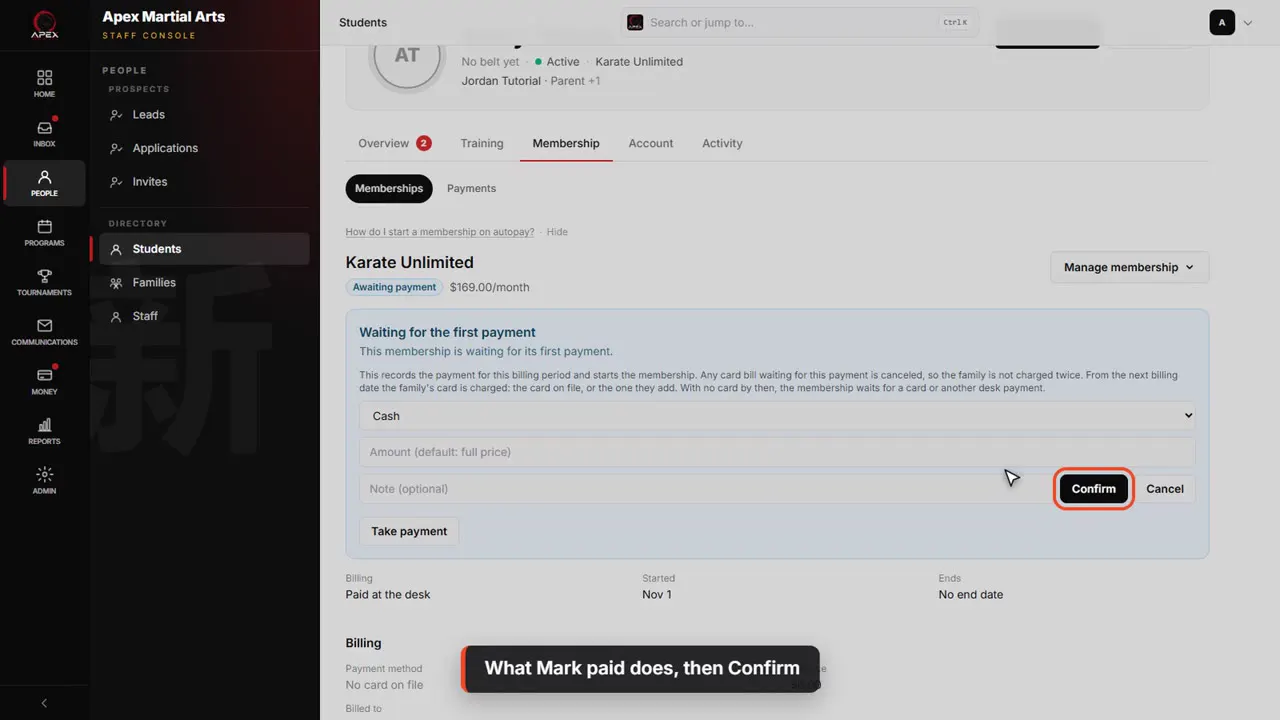
What Mark paid does, then Confirm
Mark paid records this month's payment and starts the membership. From the next billing date, the family's card is charged. Click Confirm.
The membership page
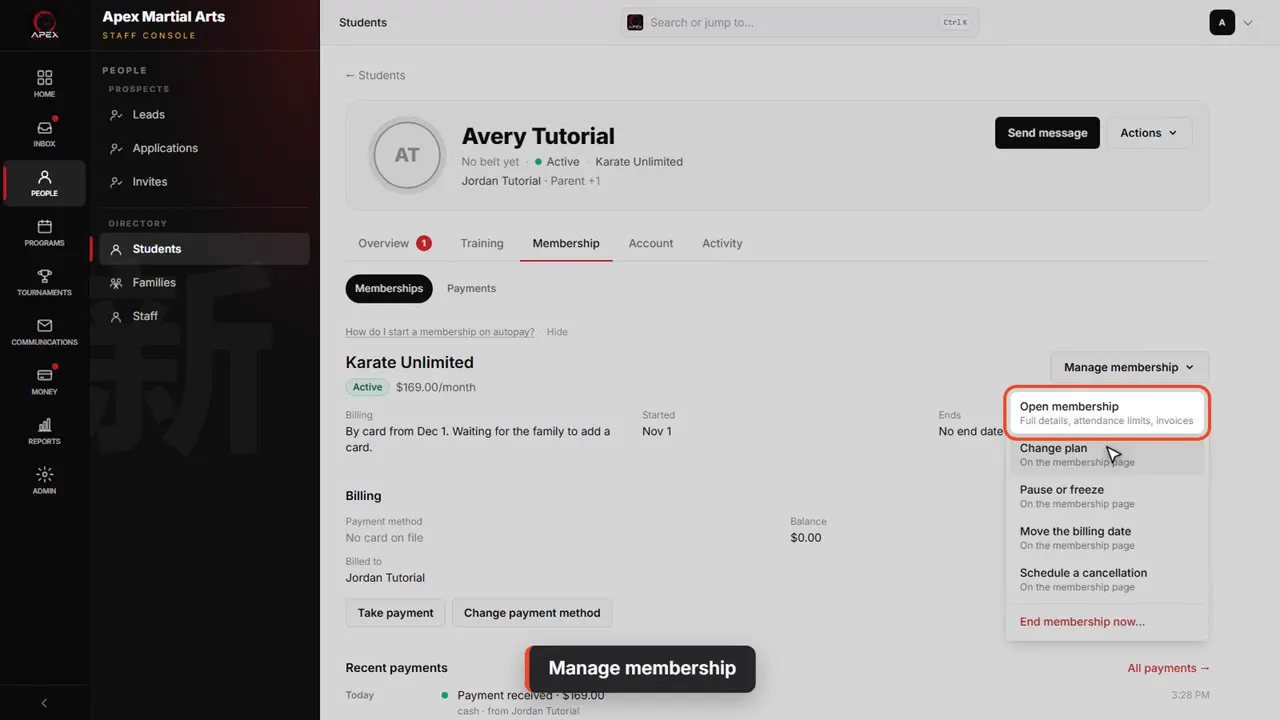
Manage membership
Everything else is under Manage membership: pausing, moving the billing date, scheduling a cancellation, or ending it now. Click Open membership.
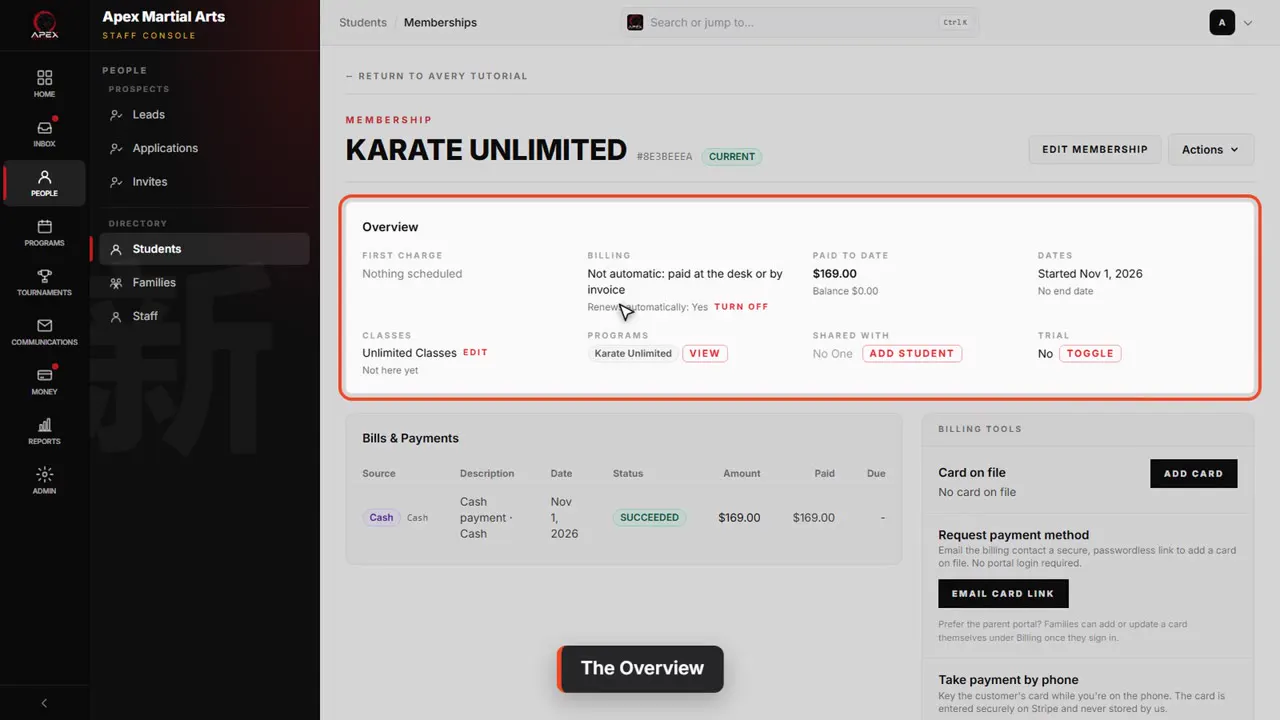
The Overview
The membership page opens on an Overview: the next charge, how it's billed, what's been paid and any balance, the dates, the classes and the programs.
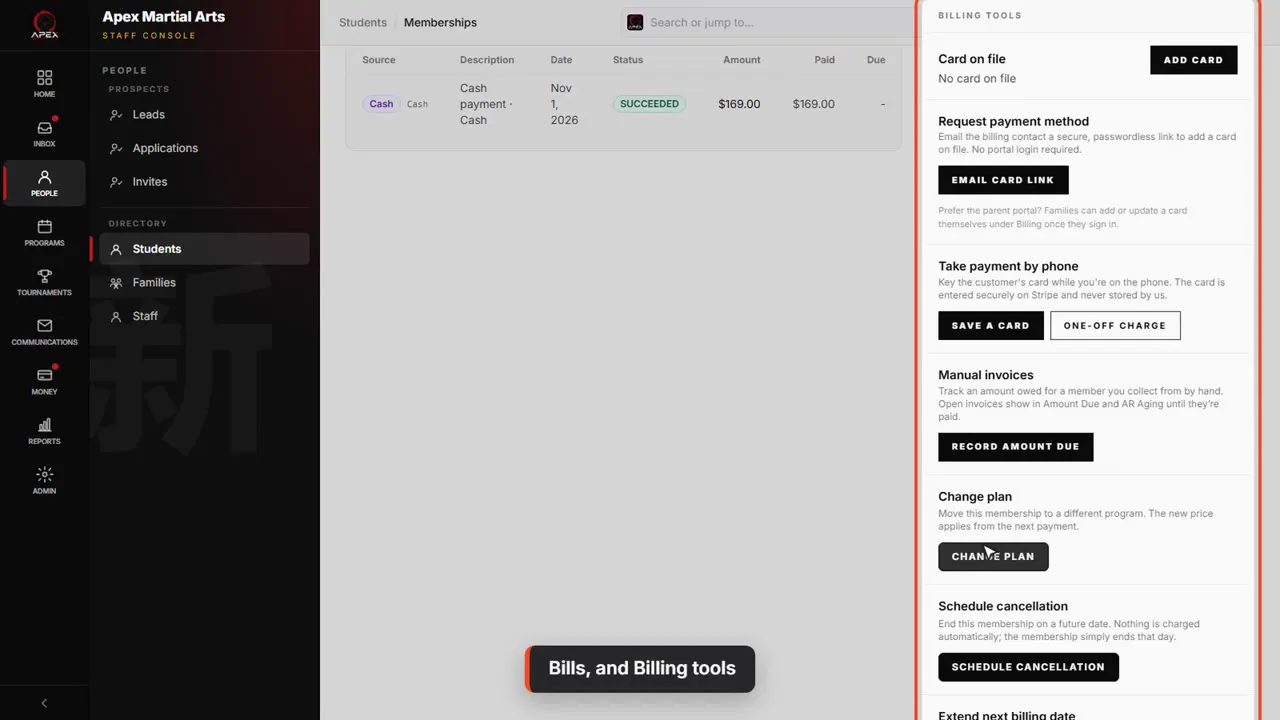
Bills, and Billing tools
Bills and Payments lists every bill and payment. Billing tools has a row for each change: the card, a card link, a payment by phone, the plan, a cancellation, the billing date, and a freeze.
Pause
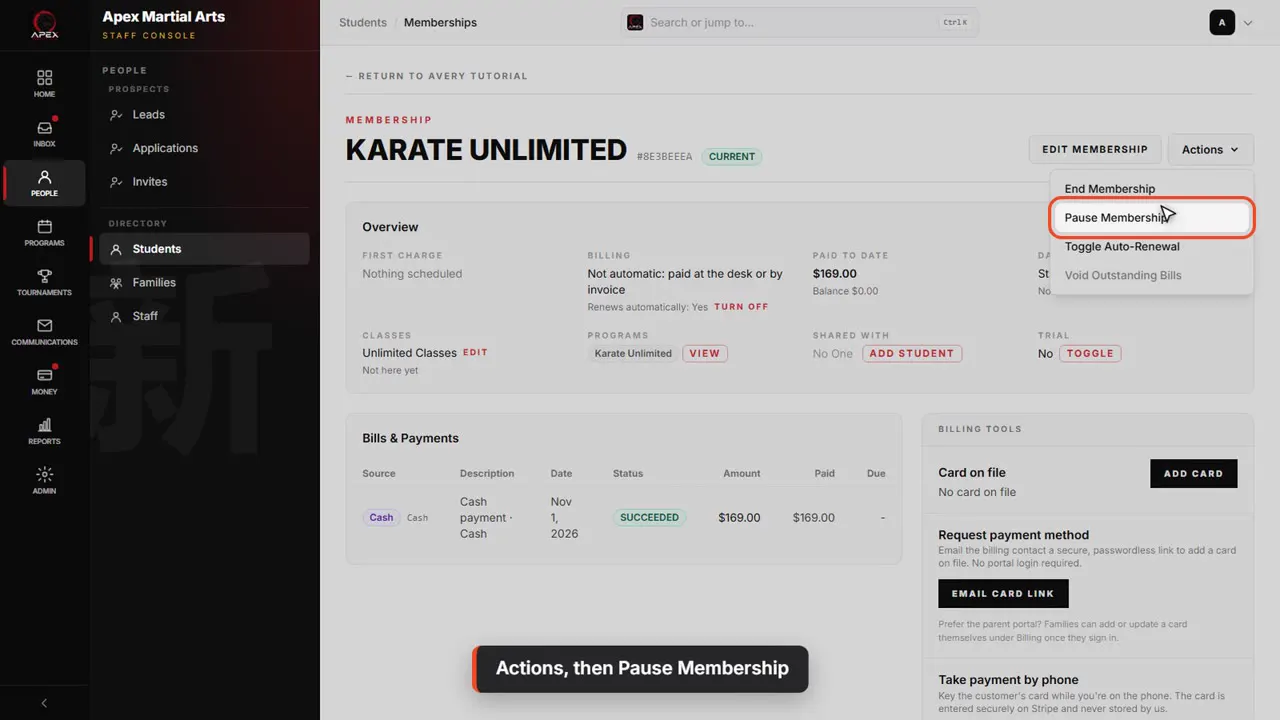
Actions, then Pause Membership
To pause it, click Actions at the top of the page, then Pause Membership.
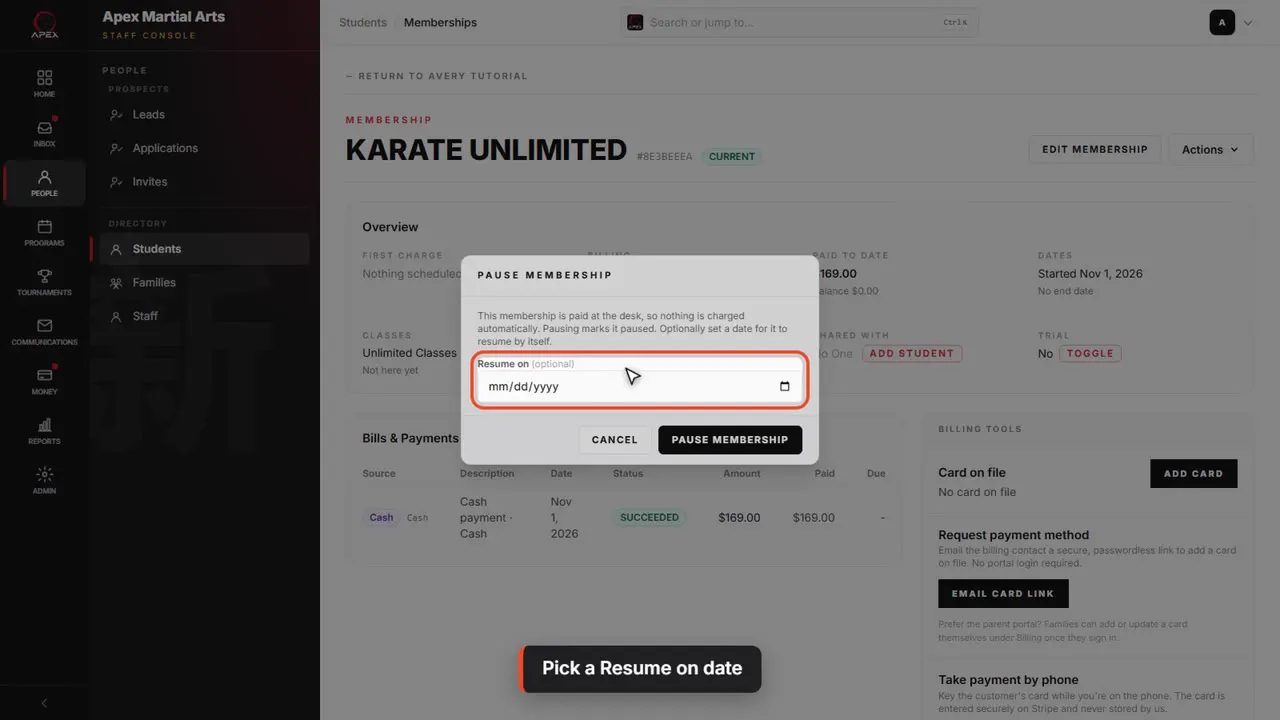
Pick a Resume on date
Paid at the desk, so nothing is charged anyway; pausing marks it paused. Pick a Resume on date and it resumes by itself that day, or leave it blank and resume it yourself.
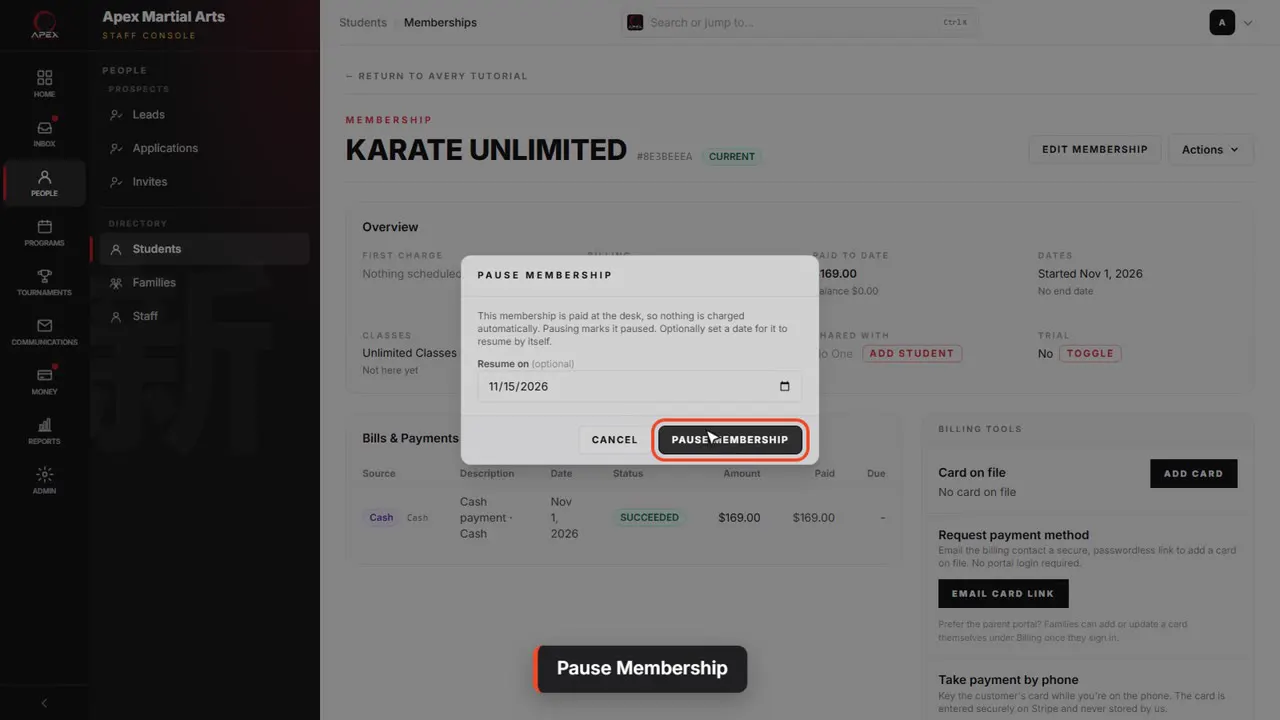
Pause Membership
Click Pause Membership.
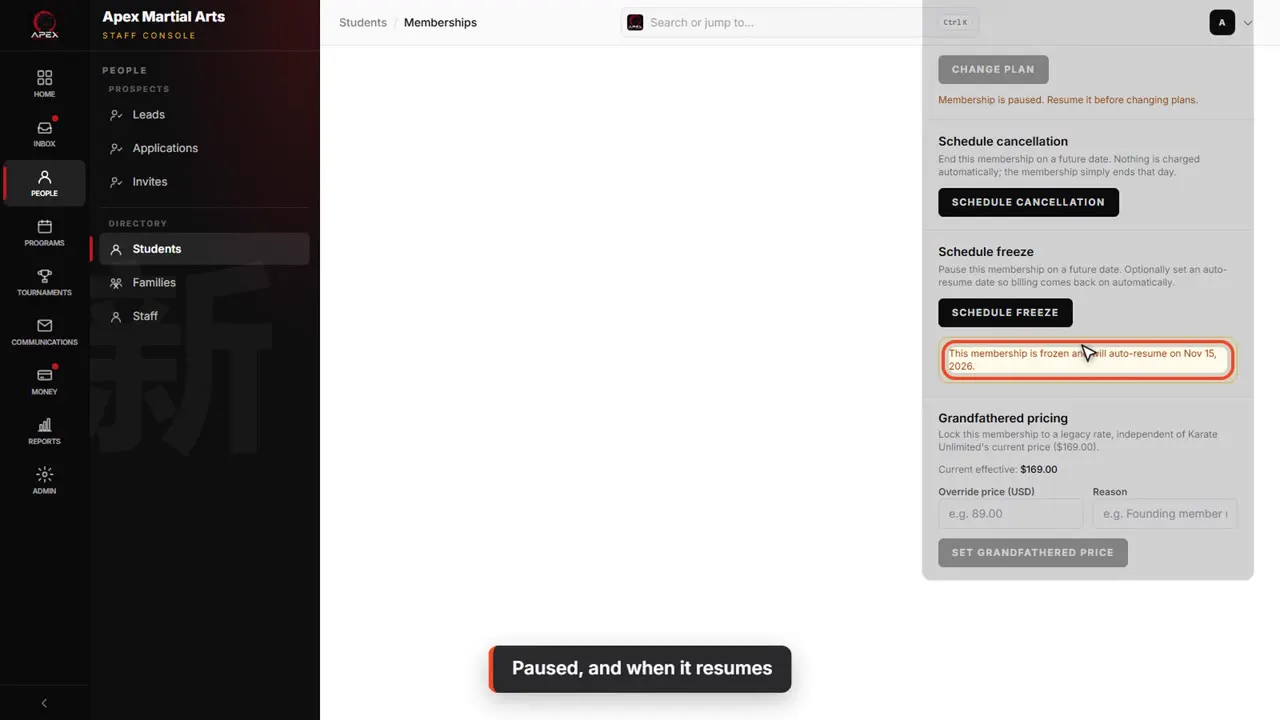
Paused, and when it resumes
It now shows Paused at the top. Further down, the page says the date it resumes by itself.
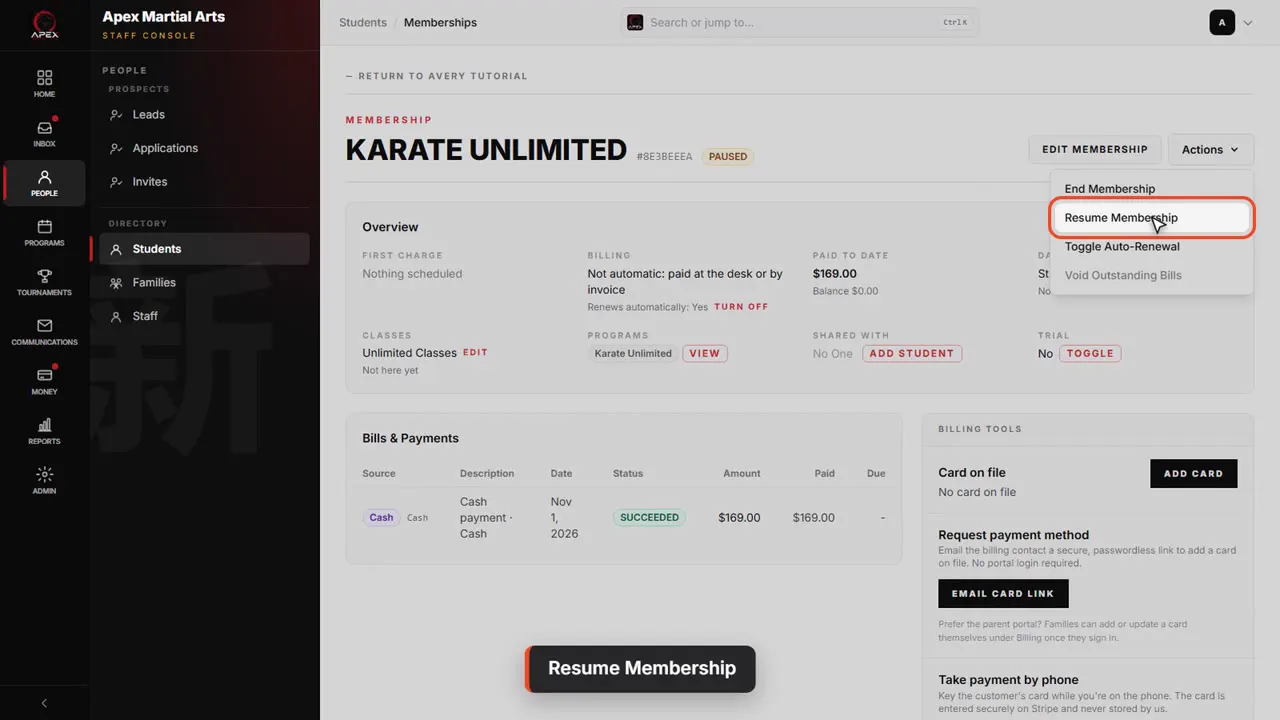
Resume Membership
To bring them back early, click Actions, then Resume Membership.
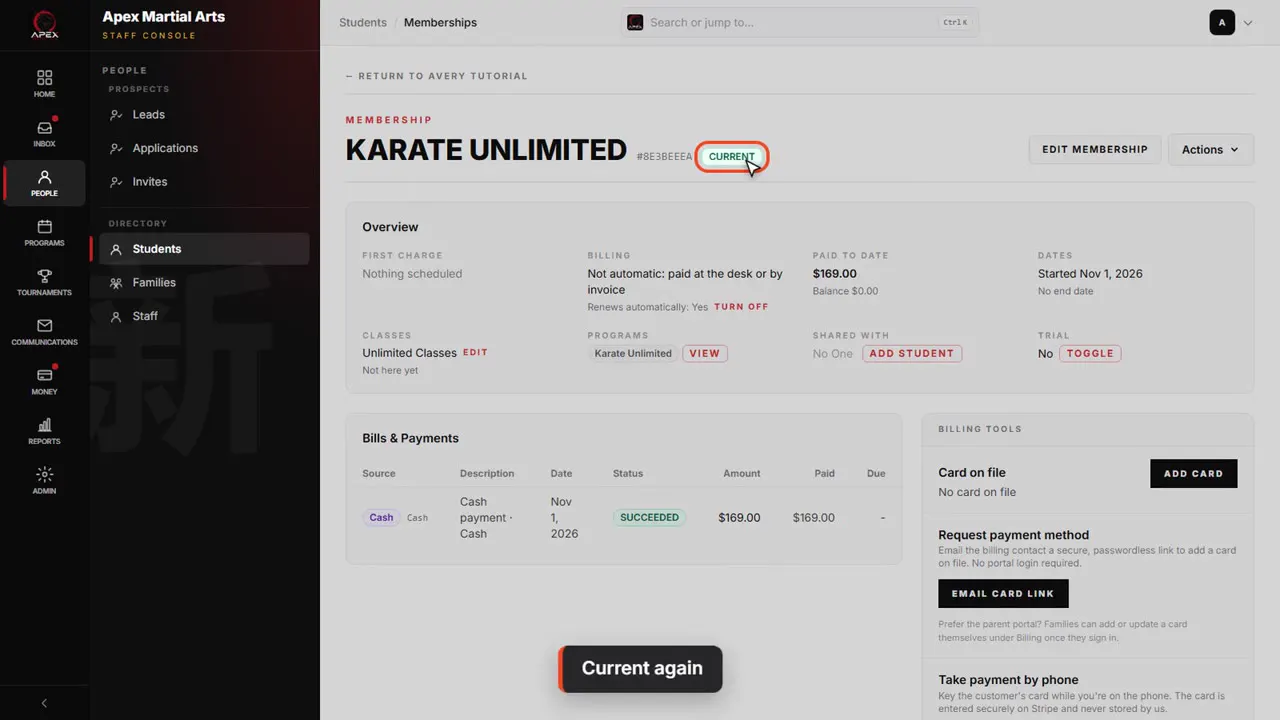
Current again
It shows as Current again, and billing carries on as before.
Move the billing date
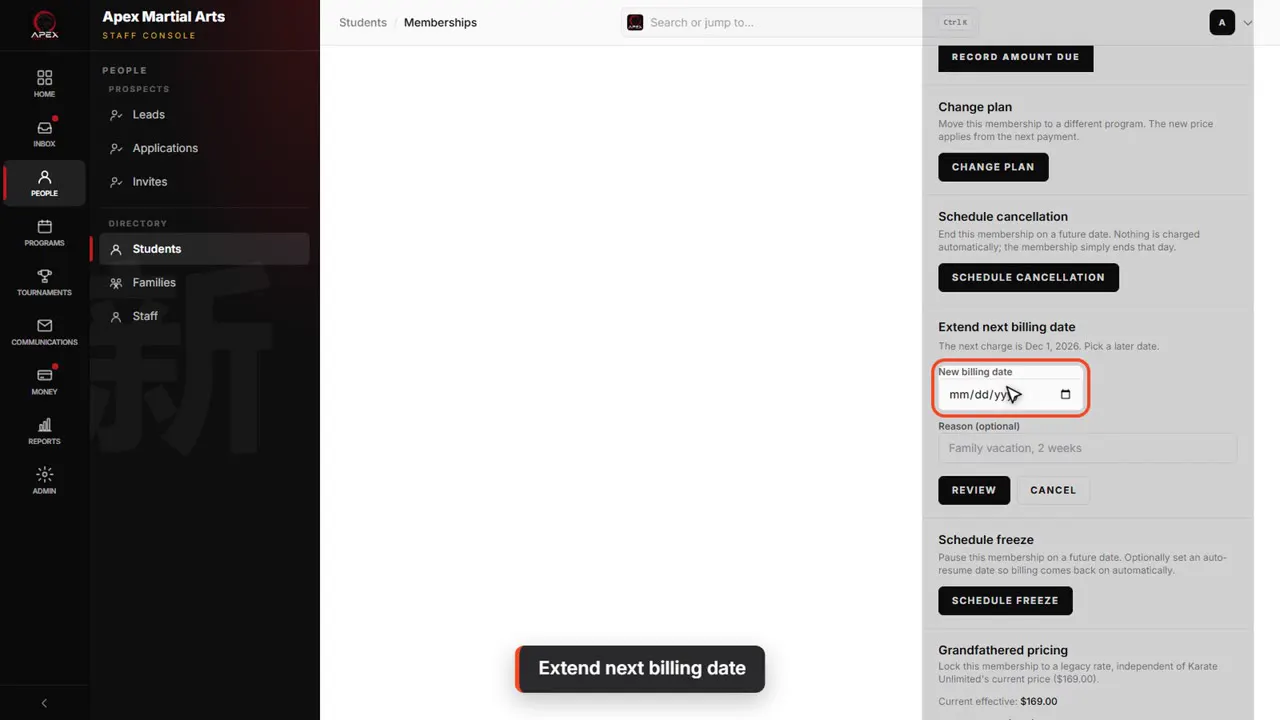
Extend next billing date
After a family has been away, Extend next billing date moves their next charge later, at no cost. Click Extend and pick the new date.
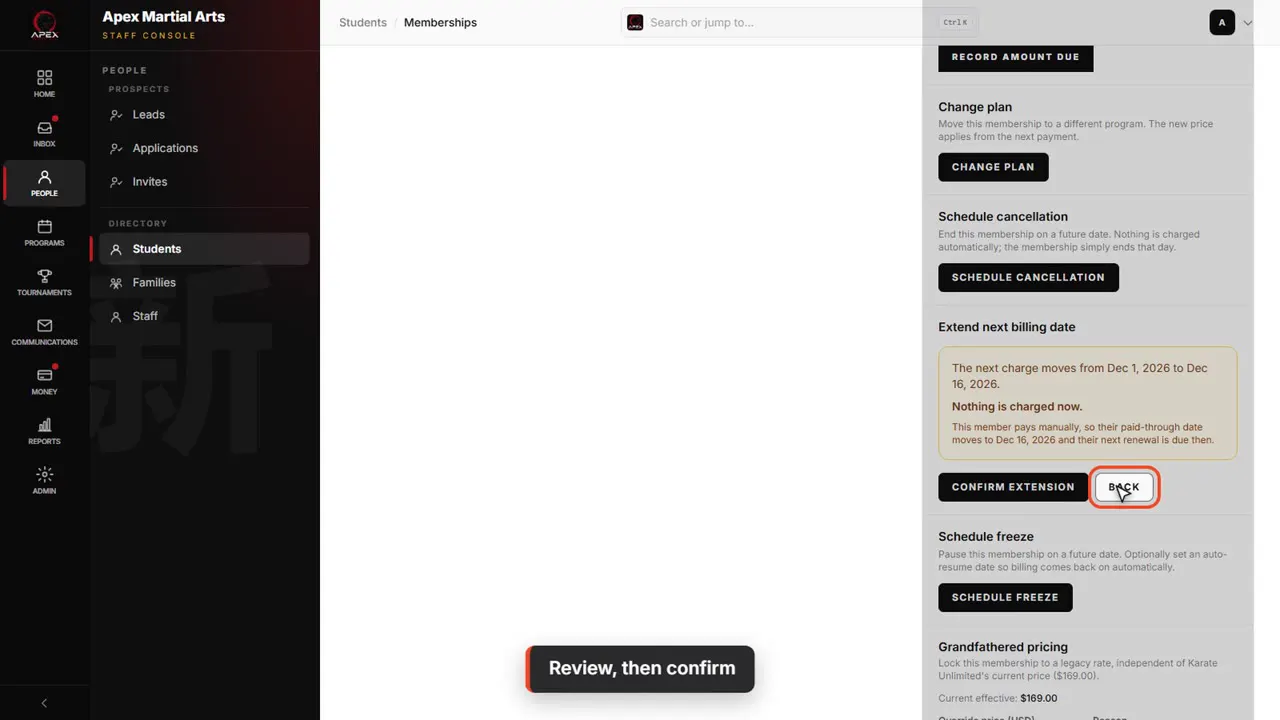
Review, then confirm
Click Review. It shows the old and new dates, and that nothing is charged now. Confirm extension saves it. We will go back without saving.
Schedule a cancellation
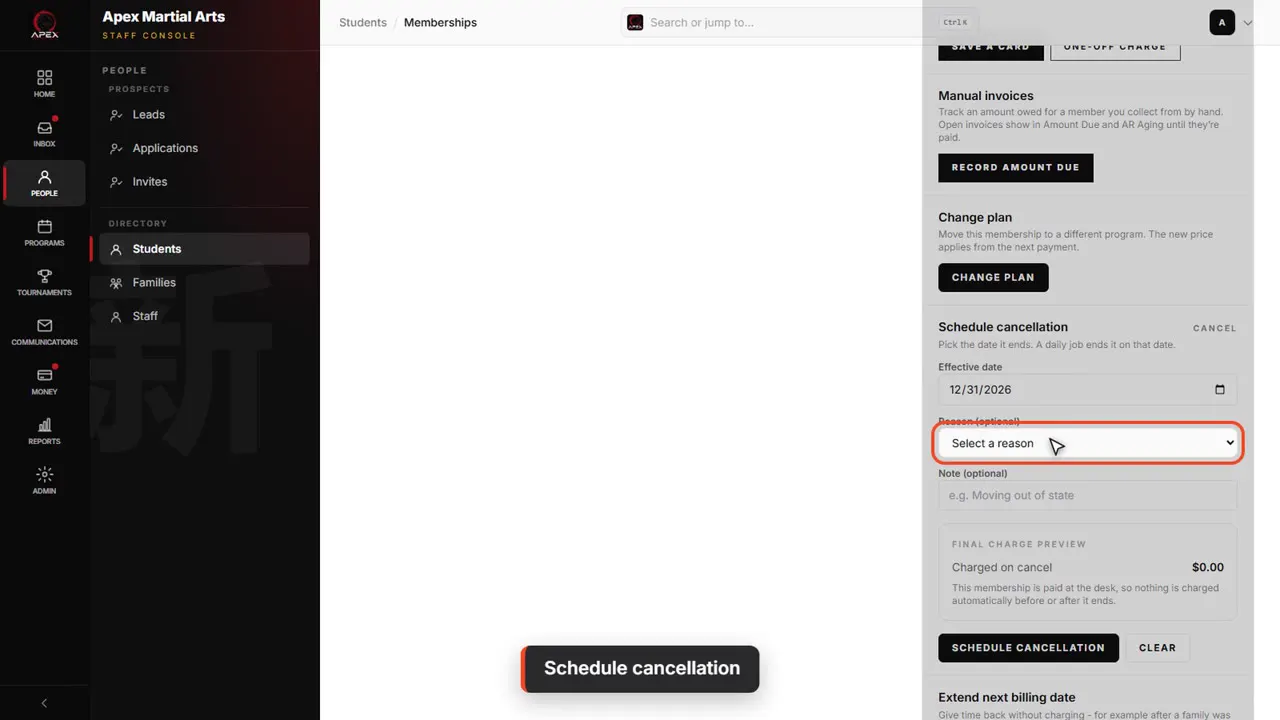
Schedule cancellation
When a family gives notice, click Schedule cancellation. Pick the date it ends, and a reason if you like.
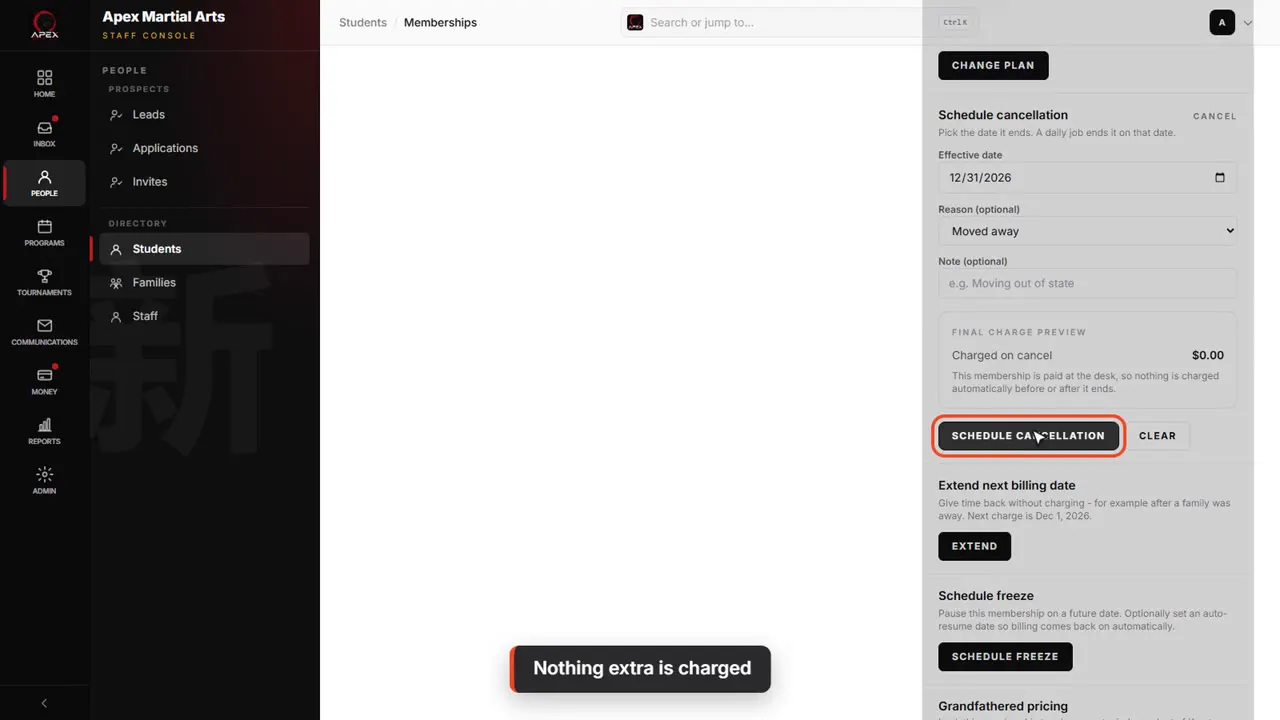
Nothing extra is charged
The preview shows nothing extra is charged. They keep what they have paid for, and it ends on that date. Click Schedule cancellation.
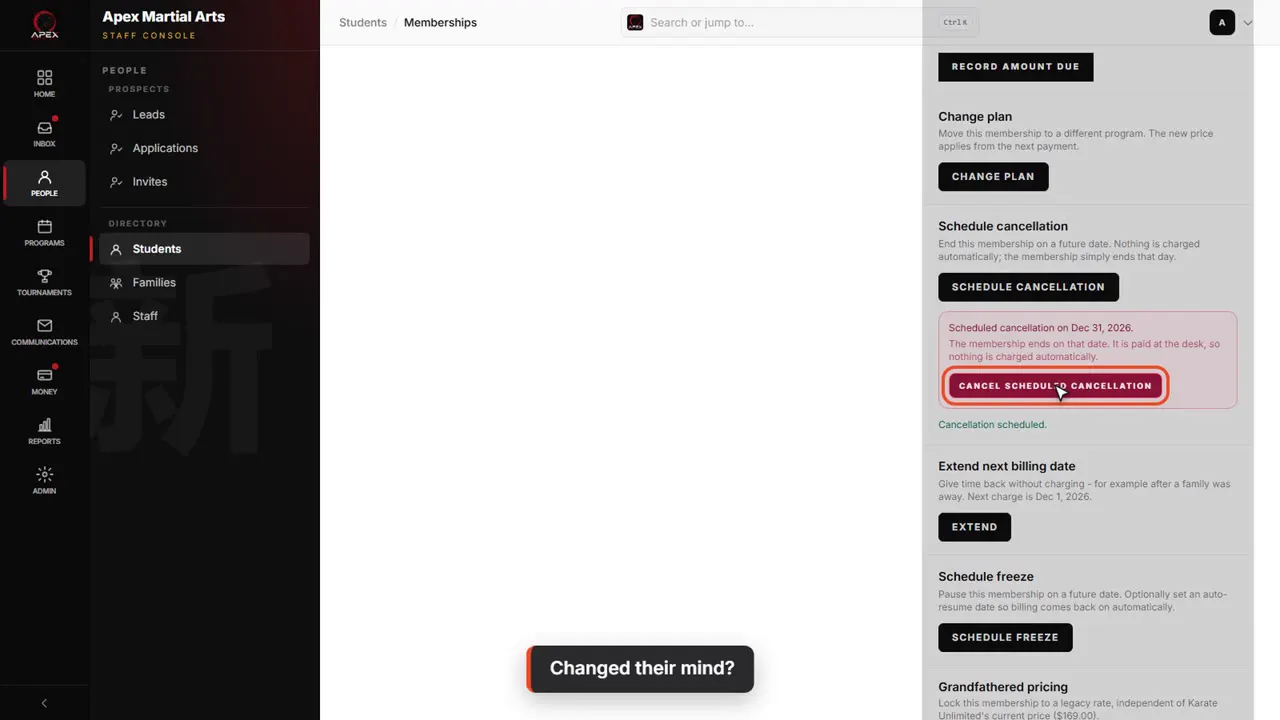
Changed their mind?
The date shows here. If they change their mind, click Cancel scheduled cancellation.
End it now
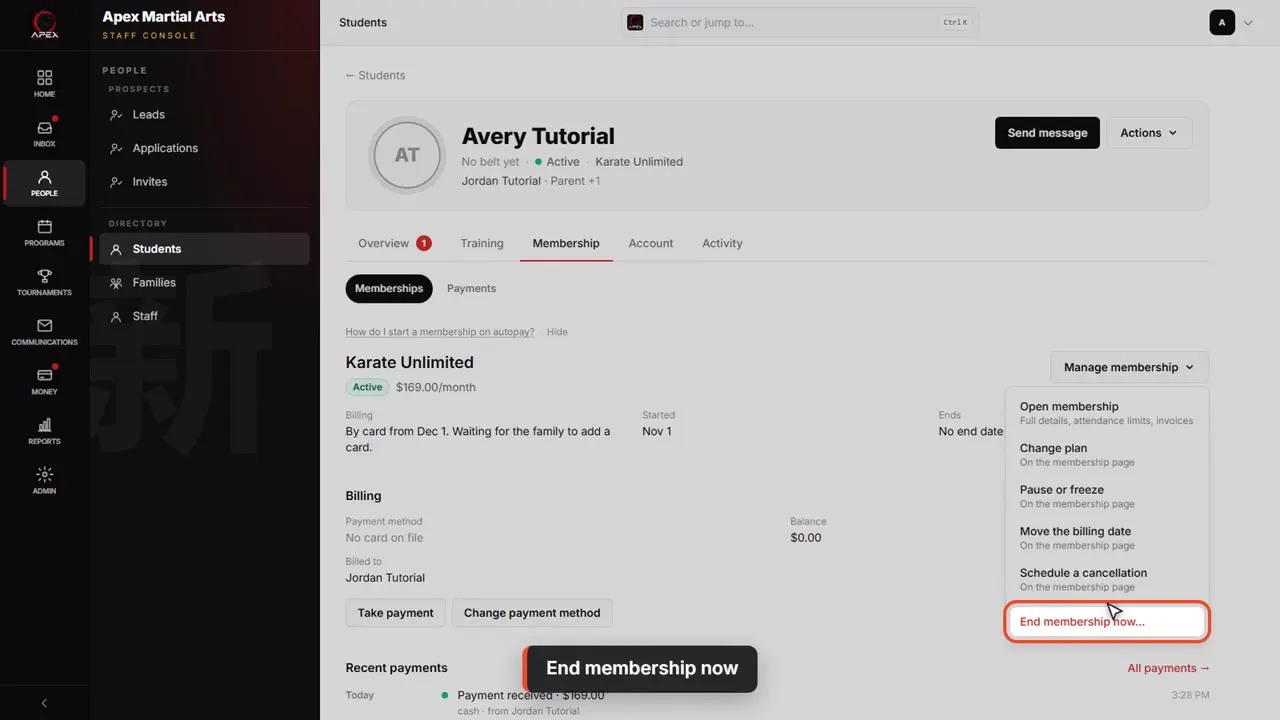
End membership now
To end a membership today, go back to the student. On the Membership tab, open Manage membership and click End membership now.
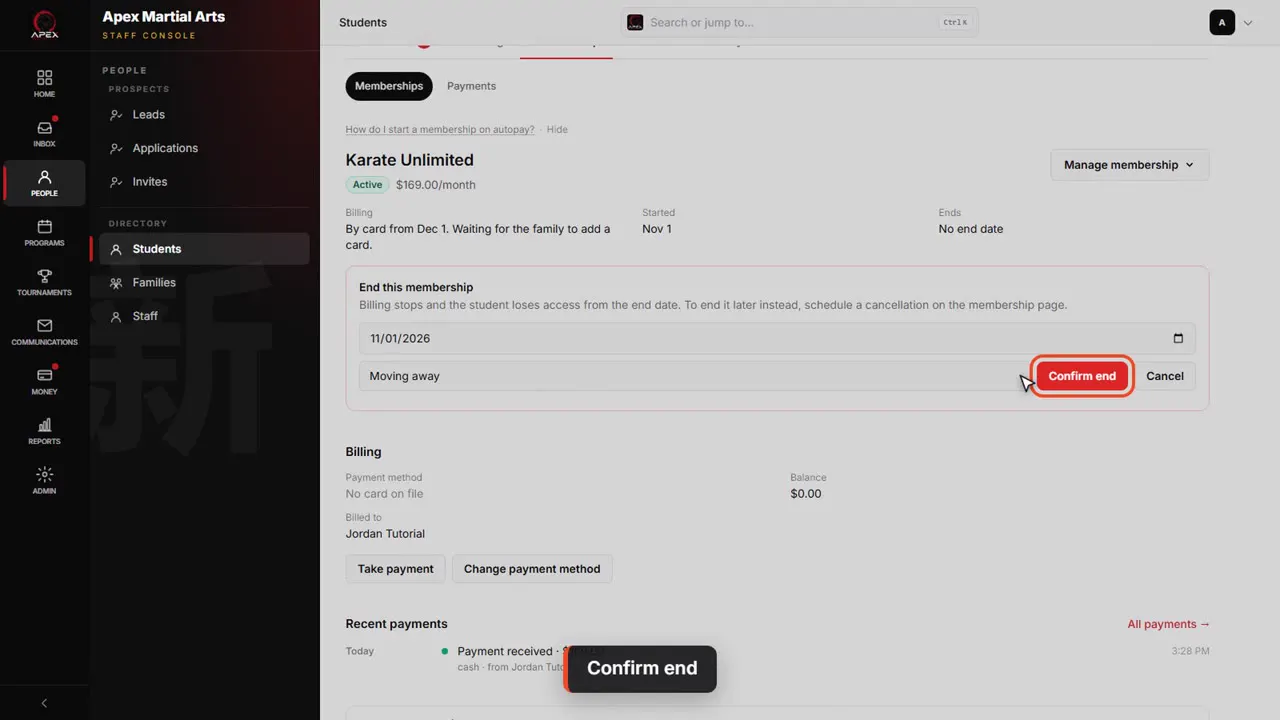
Confirm end
The end date is today. Add a reason, then click Confirm end. Billing stops, and nothing already paid is refunded.
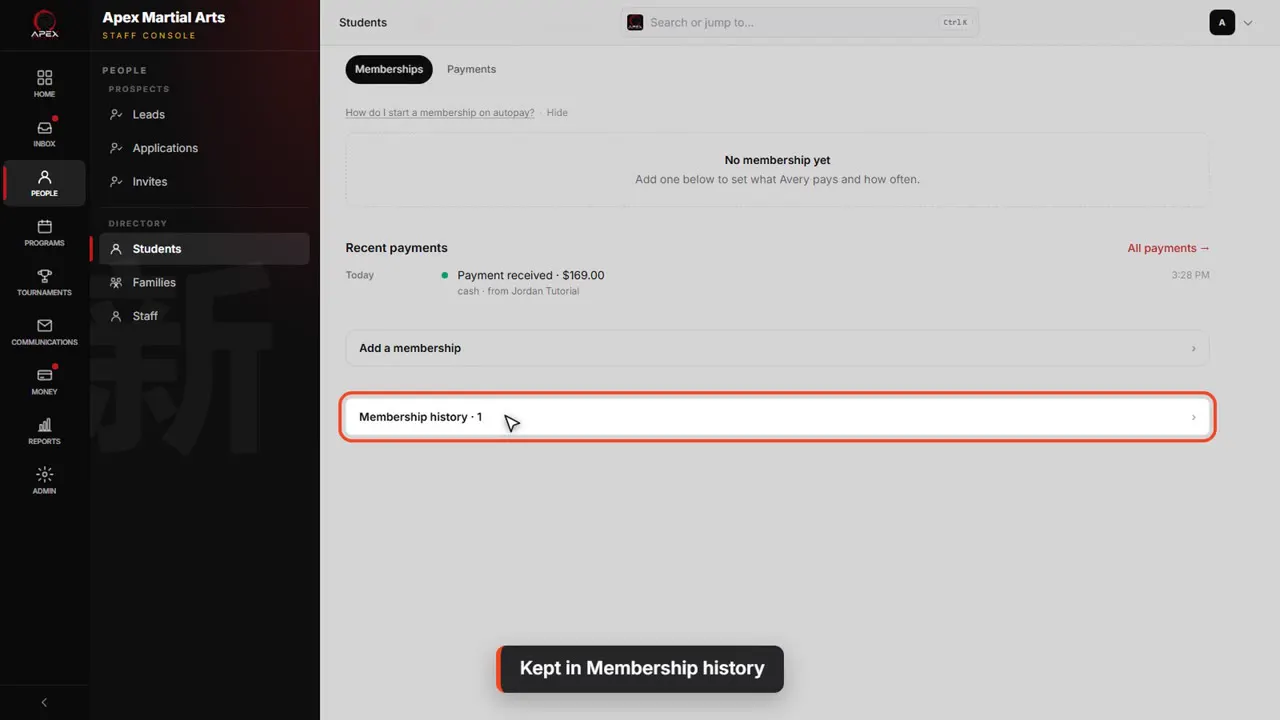
Kept in Membership history
The membership moves to Membership history, with its start and end dates. Its payments stay on the student's record.
Shown with a demo school. Your screens show your own school, and may look a little different.
Read the whole video as text
In this video you'll manage a membership from start to finish: adding it, taking the first payment, pausing it, moving the billing date, and cancelling it.
Open the student's profile. Search finds them by name. Then click the Membership tab.
With no membership yet, the Add a membership form is already open. Pick the account holder who pays, then the program.
The start date is today unless you change it. Class allowance is unlimited, or a set number of classes a week, a month, or on a class card.
Family setup is how you get their card. The first choice emails one setup link: the family signs the waiver, saves a card for autopay, and creates their app login.
Or email only a link to add their card. Or send nothing and collect the card yourself. We'll send nothing.
Click Add membership. Nothing is charged yet: it waits for the family's card or a payment.
It shows Waiting for the first payment. When their card is saved, the membership starts and billing runs from the start date. Paying at the desk instead? Click Mark paid.
Pick cash or check, and leave the amount blank for the full price.
Mark paid records this month's payment and starts the membership. From the next billing date, the family's card is charged. Click Confirm.
Everything else is under Manage membership: pausing, moving the billing date, scheduling a cancellation, or ending it now. Click Open membership.
The membership page opens on an Overview: the next charge, how it's billed, what's been paid and any balance, the dates, the classes and the programs.
Bills and Payments lists every bill and payment. Billing tools has a row for each change: the card, a card link, a payment by phone, the plan, a cancellation, the billing date, and a freeze.
To pause it, click Actions at the top of the page, then Pause Membership.
Paid at the desk, so nothing is charged anyway; pausing marks it paused. Pick a Resume on date and it resumes by itself that day, or leave it blank and resume it yourself.
Click Pause Membership.
It now shows Paused at the top. Further down, the page says the date it resumes by itself.
To bring them back early, click Actions, then Resume Membership.
It shows as Current again, and billing carries on as before.
After a family has been away, Extend next billing date moves their next charge later, at no cost. Click Extend and pick the new date.
Click Review. It shows the old and new dates, and that nothing is charged now. Confirm extension saves it. We will go back without saving.
When a family gives notice, click Schedule cancellation. Pick the date it ends, and a reason if you like.
The preview shows nothing extra is charged. They keep what they have paid for, and it ends on that date. Click Schedule cancellation.
The date shows here. If they change their mind, click Cancel scheduled cancellation.
To end a membership today, go back to the student. On the Membership tab, open Manage membership and click End membership now.
The end date is today. Add a reason, then click Confirm end. Billing stops, and nothing already paid is refunded.
The membership moves to Membership history, with its start and end dates. Its payments stay on the student's record.
That's a membership from start to finish.
Up next · Money
Take a payment or give a refund
Charge a card, write down a cash or check payment, and give money back in full or in part.
Watch next: Take a payment or give a refundBefore this: Find any student
Stuck?
In QuickKicks, open Admin, then Support (or Help, in the simpler menu), and send us a message. Or email hello@quickkicks.app.